Painting Your Experimental Aircraft: A First-Hand Guide

There is a lot of scattered advice on painting a homebuilt, and very little of it is one builder documenting the whole thing start to finish. This is that. Everything here is from finishing my own Sling TSi, N223LB, at home: the paint I chose, the shop I built to shoot it, the test panels I sprayed, and what I would do differently.
Do the paint yourself
I admire Evoke's work, but I think builders abdicate too much of the finish to a shop, especially the airplanes competing for awards at AirVenture or Sun 'n Fun. If you are going to get a craftsmanship award, you should be the craftsman. I wanted a scheme that was cool and unique but that I could actually pull off myself.
That is where Evoke fit. They worked up a DIY-able design and a practice kit, so I could try and refine the skills before I ever touched the airplane. I do not know how to run an airbrush, and I was not going to spend 1,100 hours on the finish, but I still wanted it to look unique and tasteful. Evoke was willing to iterate on the design until we got it to something I could shoot.
I ruled out paying a shop to paint it, mostly on cost, and I ruled out a solid color with vinyl graphics. Vinyl wears and needs replacing every five years or so, it is harder to install, and it is harder to span control surfaces, which limits the design. Mess up paint and you sand it back and start over. Mess up vinyl and you order a replacement and wait.
The scheme
Here is where it is all headed. I worked the design up with Evoke Aircraft Design: a white airframe with a Cactus-grey and Lava-orange sweep running nose to tail and a grey-black accent. I wanted something unique and tasteful that I could actually shoot myself, so Evoke iterated with me until we had a scheme I could pull off with the DIY-at-home approach and a practice kit.
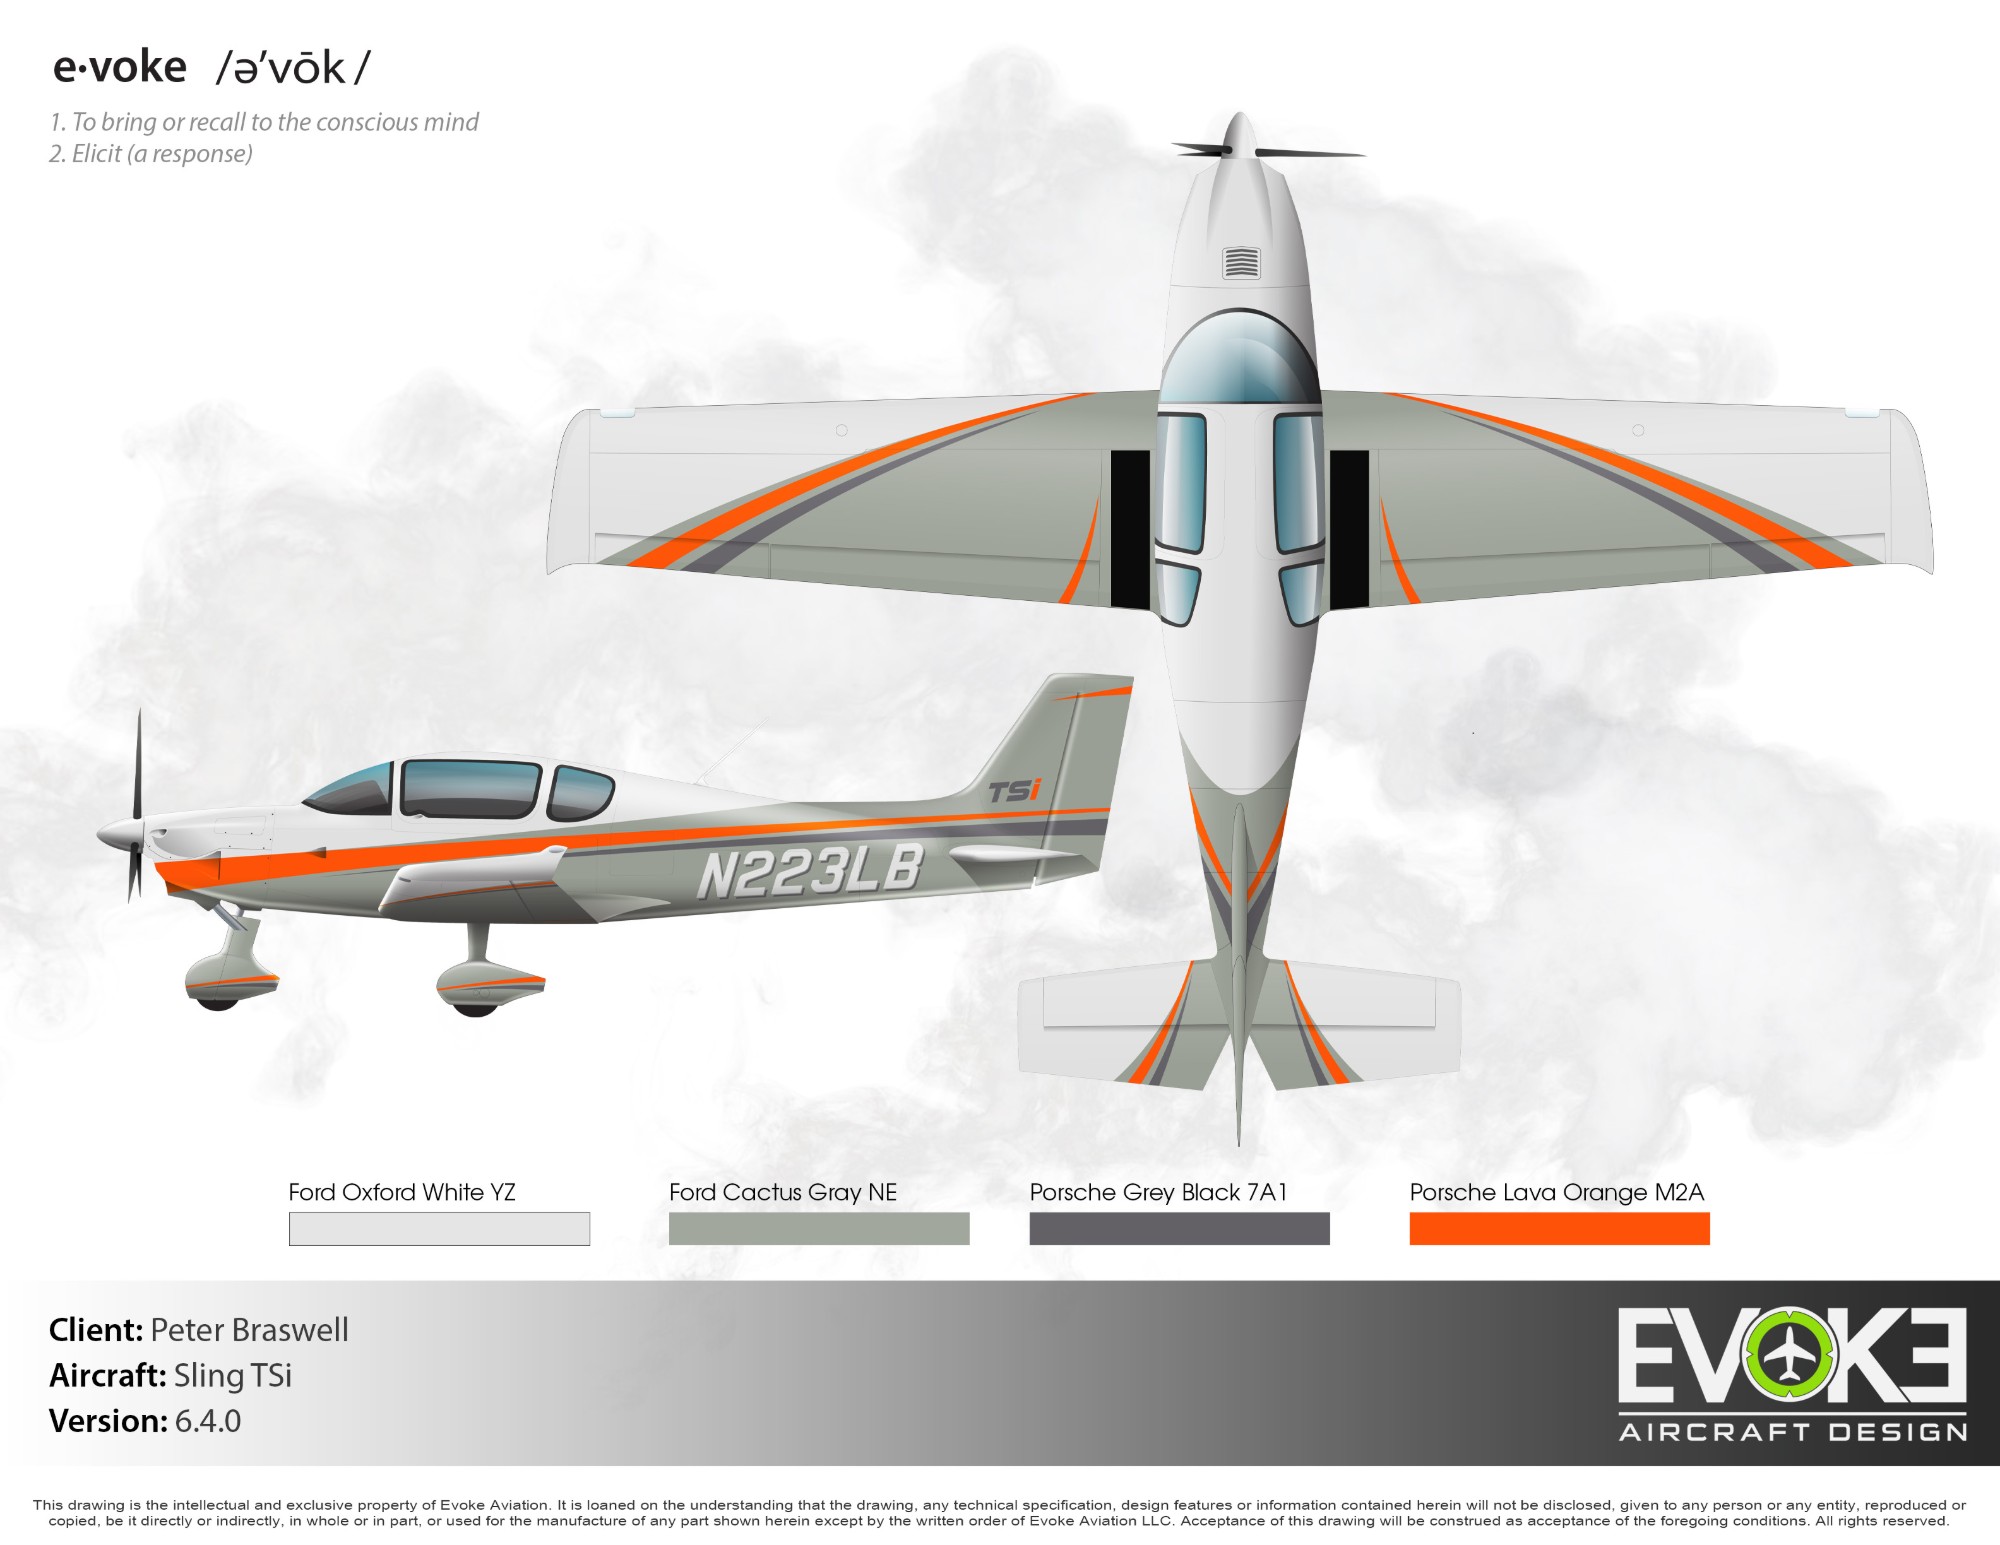
Those four colors are exactly the OEM Select basecoats further down: Ford Oxford White (YZ), Ford Cactus Grey (NE), Porsche Lava Orange (M2A), and Porsche Grey Black (7A1). No paint is on the airframe yet, so this is the target — the painted result will go right here as it happens.
Choosing a paint system
The equipment drove the paint decision. I run an Eastwood turbine spray gun. I was originally going to use Stewart Systems waterborne aircraft paint, but they told me they do not support a turbine system: it produces heat that can make the paint do whacky things. Some builders get away with it, some do not, and they would not offer technical assistance if I went that route.
So I moved to Eastwood's OEM base and clear. It is user-friendly, it works with the turbine gun, and it comes in any color you can give a paint code for. Here is what I used and where to get it:
Supplies & where to get them
The paint, primer, tools, and gear I actually used on this build — and where to buy them.
Tools
Paint
Other
Building a shop I could paint in
I did not want to smoke out my family, so I put real thought into the environment before the finish. I set up a 33x20x13 ft Vevor inflatable spray booth with enhanced, paint-booth-grade filters. For breathing air and protection I use a Hobby Air fresh-air system, standard gloves, and a Tyvek paint suit.
The prep is the job
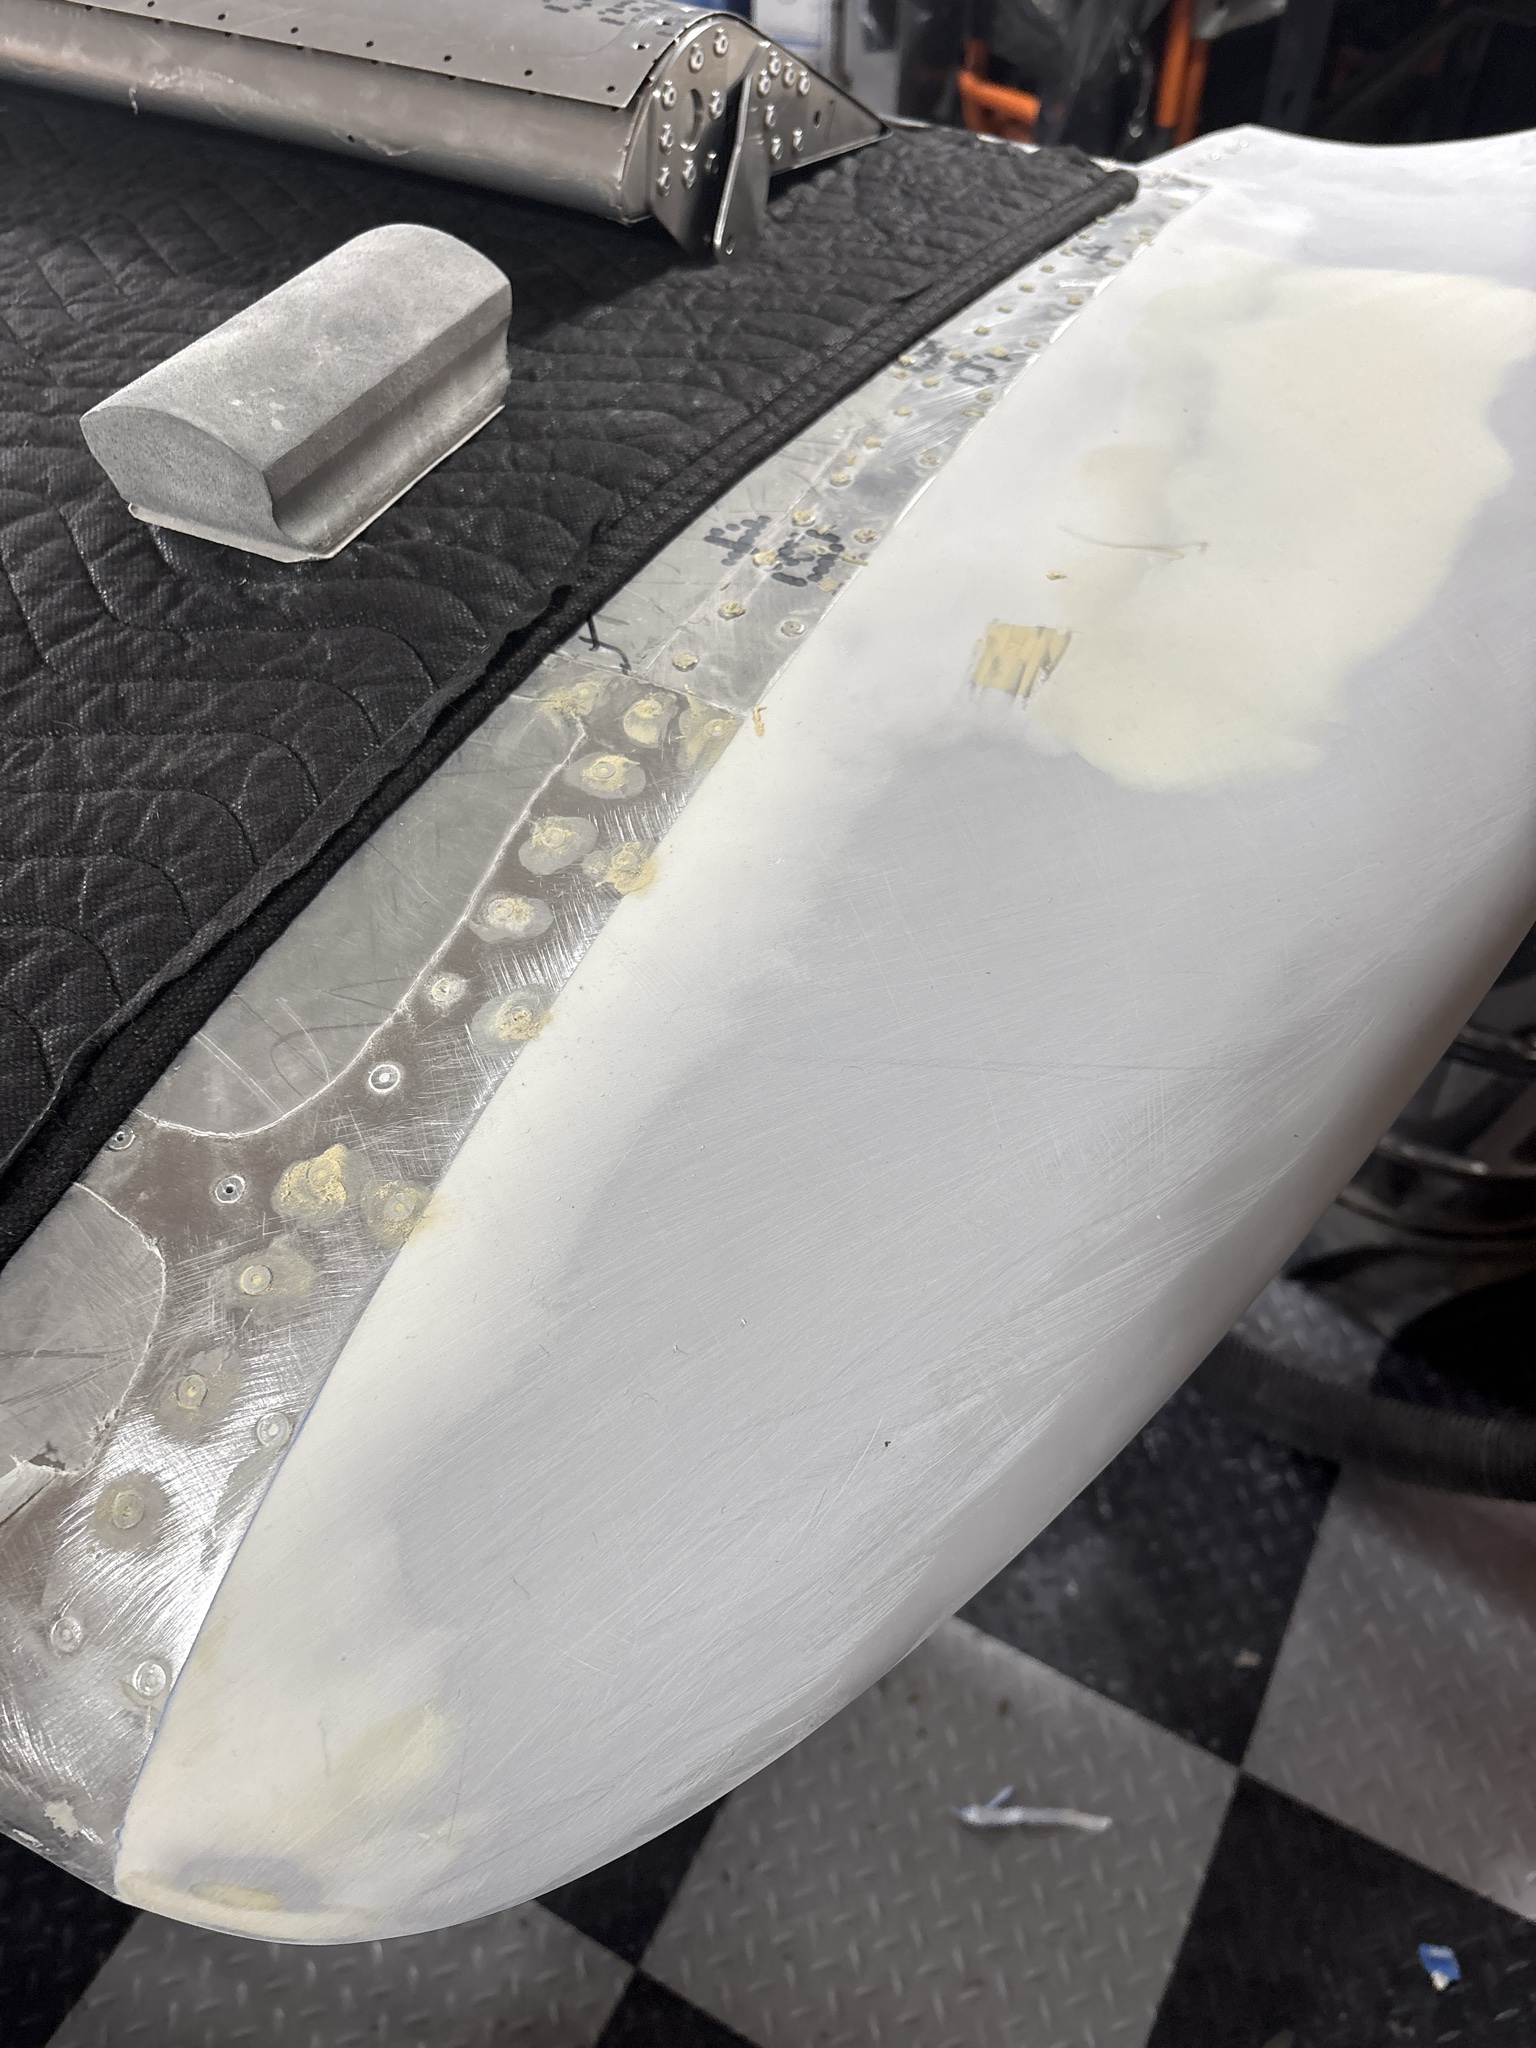
Remember the TL;DR: 90% of a great paint job is prep. That is not a throwaway line. Before any color goes on, you are filling pull rivets so they look like solid rivets, chasing gaps on the fiberglass wingtips, and sanding, filling, and sanding again. It is tedious, and it is where the finish is actually won. These are real sessions from that slog:
Spraying test panels
I had a lot to get right before I put paint on the airplane, and I had never used most of it. I had not sprayed a 2-stage base/clear system. I had an idea of the colors I wanted, but until you spray them out and clear over them you really do not know how they will look. I had never sprayed through a mask. I had a new 3M PPS disposable cup system I had never used. And I wanted to confirm my equipment was actually working.
So I built up to it. I started with cheap acrylic hobby paint on craft paper just to get familiar with the gun's settings. Then I moved to epoxy primer and urethane primer on test panels to check coverage, technique, spray-gun needle size, and flash times. I was also learning new Eagle-brand abrasives at the same time, so there were a lot of unfamiliar pieces to get comfortable with.
Priming
With the parts prepped, the first primer went on the tail: the vertical stabilizer, the rudder, and the elevator. This is the first point where the work starts to look like a finish instead of a pile of filled rivets.
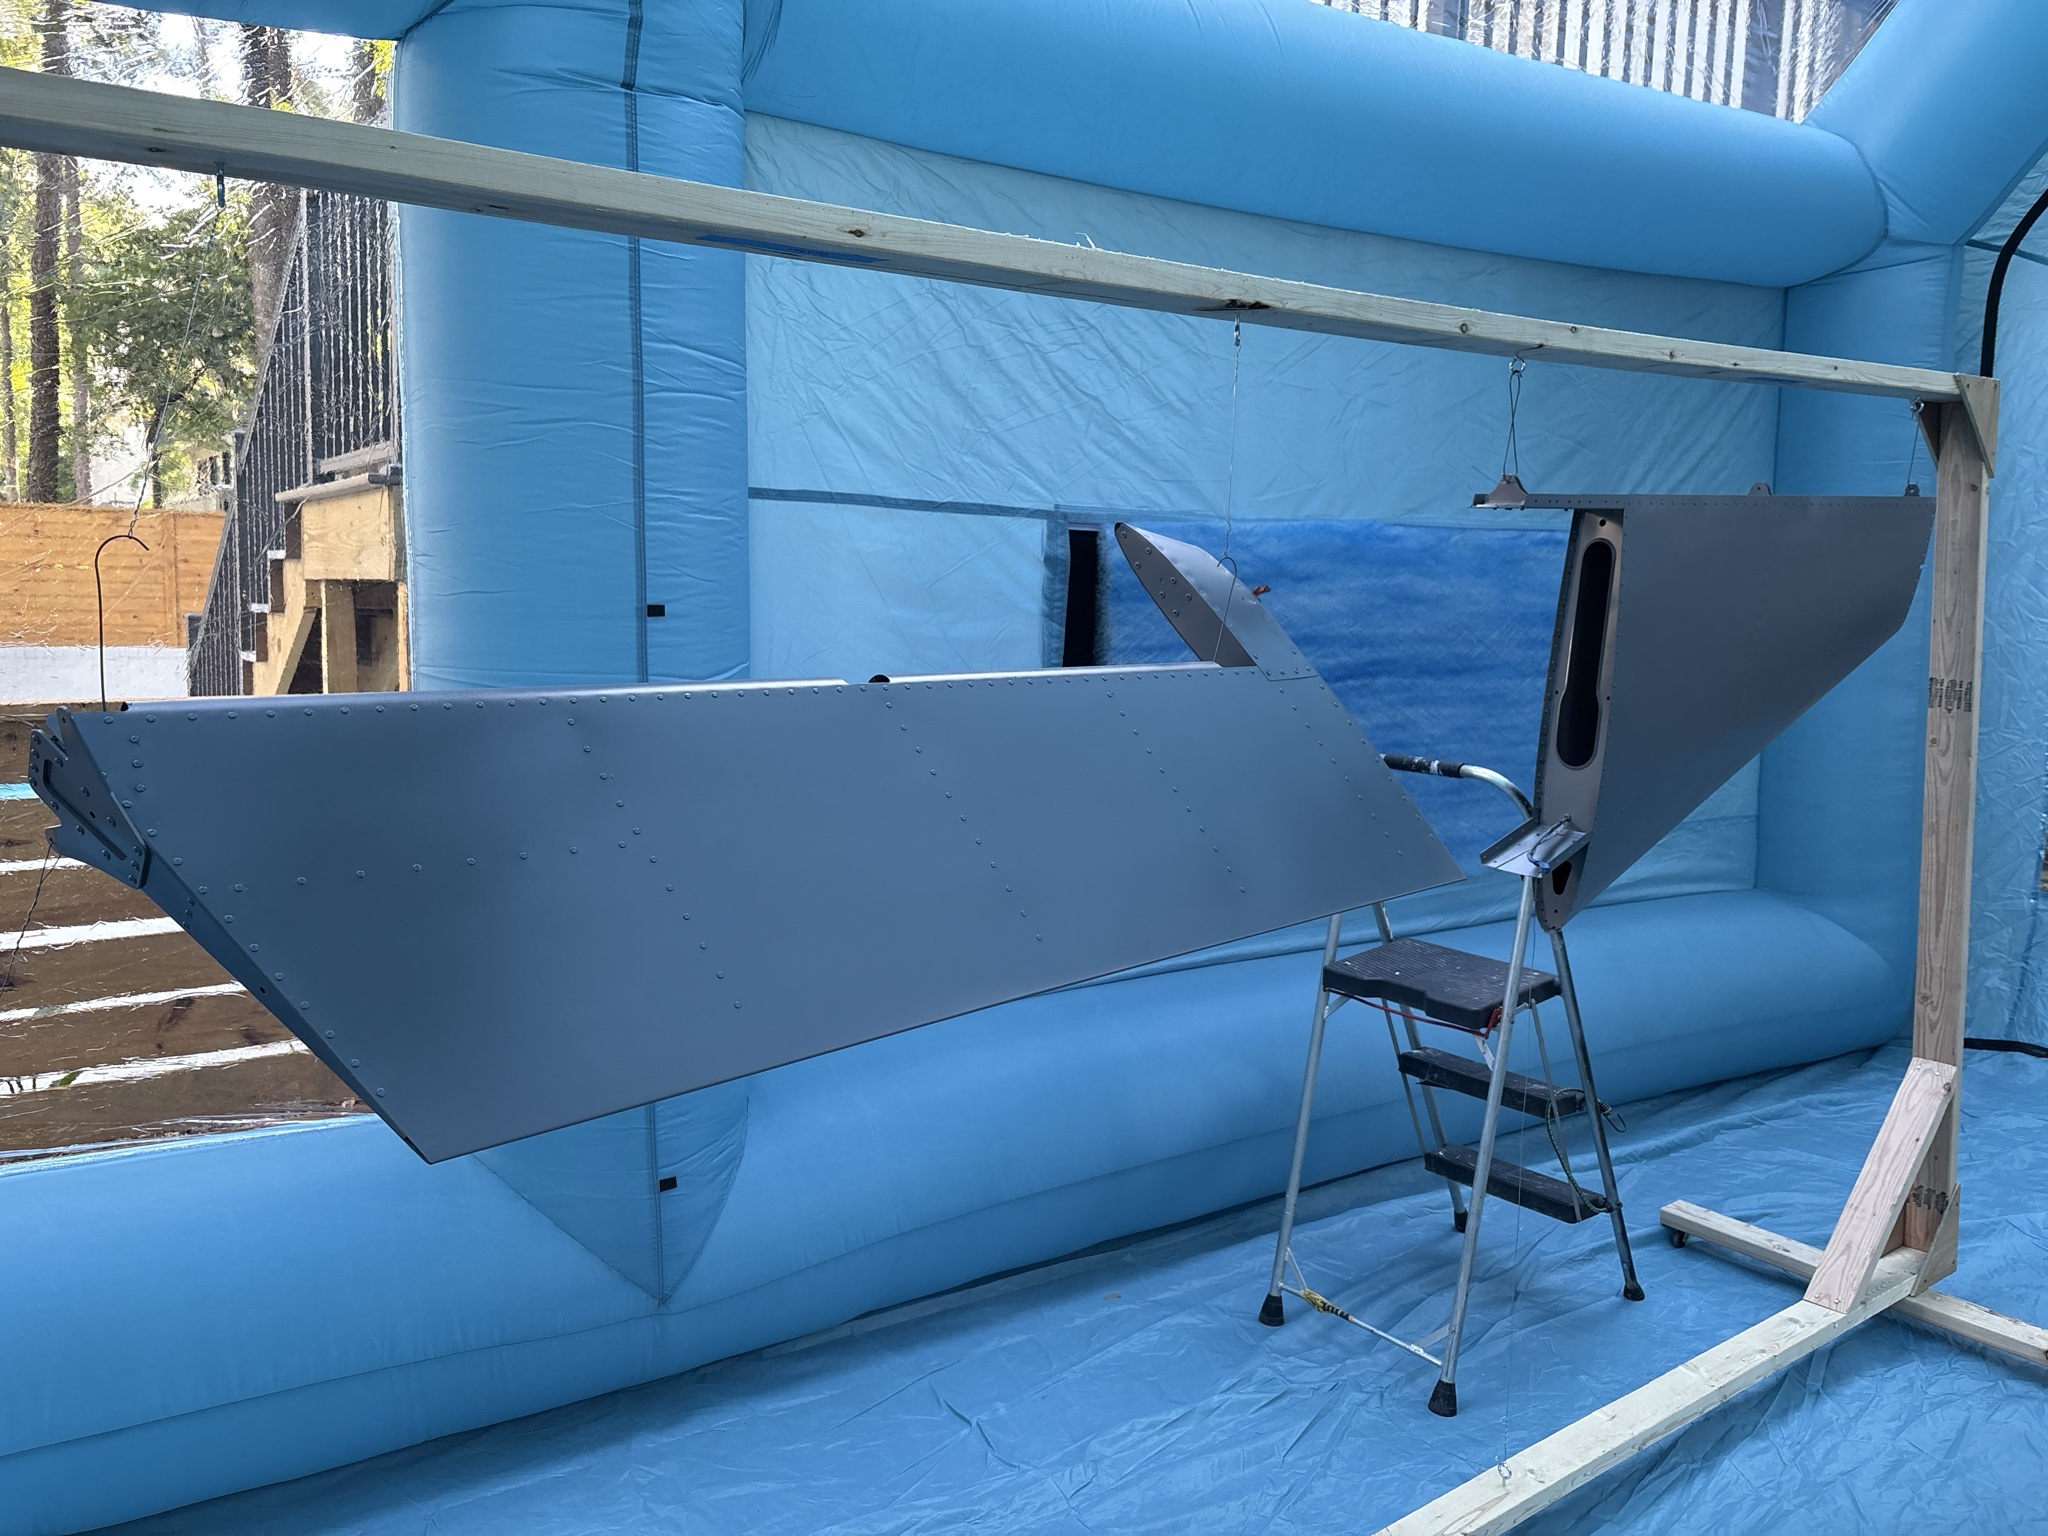
Tuning the gun and laying it down
Gun settings depend on the temperature and the material. Adjust the fan and the material knob until you get the right flow and pattern. There are plenty of YouTube videos on this. You want a clean fan pattern without a lot of dots out on the sides, because those dots are what give you orange peel and unwanted texture.
- Do the work yourself, and practice firstDecide how much of the finish is going to be your craftsmanship. I wanted a unique scheme I could actually shoot, so Evoke worked up a DIY-able design and a practice kit that let me try the skills before I touched the airplane. Spray cheap acrylic hobby paint on craft paper to learn your gun before anything expensive goes in the cup.
- Let your equipment pick your paint systemI run an Eastwood turbine spray gun, and that drove the paint decision. Stewart Systems waterborne would not support a turbine (the heat can make it behave badly and they would not offer tech help), so I went with Eastwood OEM base and clear. It is user-friendly and available in any color you can give a paint code for.
- Build a shop you can actually paint inI did not want to smoke out my family, so I set up a 33x20x13 ft Vevor inflatable booth with paint-booth-grade filters, a Hobby Air fresh-air system, gloves, and a Tyvek suit. Solve the environment before you solve the finish.
- Shoot test panels before the airplaneTest everything that is new to you: a 2-stage base/clear system, your colors under clear, masking, your gun and cup system, epoxy and urethane primer for coverage, needle size, and flash times. It is a lot to get right, and panels are cheap compared to a wing.
- Tune the gun, follow the TDS, respect flash timesAdjust the fan and material knobs to the temperature and material until the pattern is clean with no heavy dots on the edges. Follow the paint or primer TDS to the letter. Trigger off the part, keep the gun parallel and about a fist (4 in) away, lay it down, and leave it alone until it flashes. Do not go back for a little more or you will run it.
Follow the paint or primer TDS to the letter and use good spray technique. Squeeze the trigger off the part to start the flow, keep the gun parallel to the surface, and hold it about a fist, roughly 4 inches, away. Spray it and leave it alone until it flashes off. Do not go back to get a little bit more on. That is how you end up running the paint.
The production stack
After a lot of research, test panels, and false starts, the actual coating system is clean. This is the locked order of operations:
Bare / prepared aluminum
  → Eastwood 2K Epoxy Primer                         ✅ tail already sprayed
  → sand / level as necessary
  → Eastwood 2K Urethane Primer/Surfacer + 14159ZP   ← where I am now
  → final prep
  → OEM Select base colors
  → fully cure
  → Assilex K600 Sky (broad) + gray 7448 (rivets/tight geometry)
  → Eastwood Premium Show Clear (98380ZP)
  → cure
  → Buflex K3000 / localized K2000 as required
  → 3M Perfect-It RO compound → polish
The OEM Select recipe. The two high-volume colors ship unreduced: mix 1 part unreduced OEM Select + 1 part OEM Select reducer, so one quart of White or Cactus Grey yields roughly two quarts ready-to-spray. The Lava Orange and Grey Black pints are already RTS and skip that 1:1 reduction.
The complete product list
Everything I selected, bought, or have actually used so far, by function. Status is honest: some is sprayed, some is on the shelf, some is still on order.
Paint system (Eastwood)
| Product | ID / SKU | Status · use |
|---|---|---|
| 2K Epoxy Primer | 1:1 with catalyst | Owned; sprayed on the tail |
| 2K Urethane Primer/Surfacer | 4:1 primer:activator | Owned; next coat after sanding/leveling the epoxy |
| Medium Urethane Reducer | 14159ZP (70–80°F, qt) | Purchased; for the urethane primer, optionally the Show Clear |
| OEM Select — Ford Oxford White | YZ, 1 qt, unreduced basecoat | Ordered |
| OEM Select — Ford Cactus Grey | NE, 1 qt, unreduced basecoat | Ordered |
| OEM Select — Porsche Lava Orange | M2A, 1 pt, RTS basecoat | Ordered |
| OEM Select — Porsche Grey Black (Grauschwarz) | 7A1, 1 pt, RTS basecoat | Ordered |
| OEM Select Medium Reducer | 66966ZP, 1 L (×2) | Ordered, for the two unreduced quarts |
| 4:1 High Solids Urethane Premium Show Clear | Kit 98380ZP | Ordered; final clear |
| — Show Clear component | 15351ZP | part of the 98380ZP kit |
| — Show Clear Medium Activator | 15353ZP (70–80°F) | part of the 98380ZP kit |
| Intercoat Clear | 15678ZPA, 3:1 | Researched; optional, not purchased |
| — Intercoat Medium / Slow Activator | 21856ZP / 21853ZP | Identified only; not needed in the default workflow |
Spray equipment & paint delivery
| Product | ID / SKU | Status · use |
|---|---|---|
| Apollo 7500 HVLP turbine spray gun | top-feed turbine | Owned; primary gun (drove the Eastwood paint choice) |
| 3M PPS Series 2.0 H/O Starter Kit — Large | AFS-1646 | Purchased |
| — 2.0 H/O Pressure Cup — Large | 26124 (850 ml / 28 oz) | in AFS-1646 |
| — 2.0 S34 Adapter | 26129 (3/8"-18 NPS female) | Purchased for the Apollo 7500 |
| — Large liners/lids (28 oz, 200 micron, ×10) + plugs + tubing | — | in AFS-1646 |
| 3M PPS H/O Midi Starter Kit | AFS-1644 | Recommended optional add |
| — Midi liners/lids | 26112 (13.5 oz / 400 ml) | identified |
| 3M PPS Small H/O Cup | 26121 | optional |
| — Mini / Micro liners | 26114 (6.8 oz) / 26028 (3 oz) | identified only |
Preferred setup: Large PPS for wings, fuselage, and larger primer/clear sessions; Midi PPS for control surfaces and smaller batches.
Abrasives & surface prep
Pre-clear (mechanical adhesion). Procedure: fully cured OEM Select → Assilex K600 Sky on broad surfaces → gray 7448 around rivets and tight geometry → clean/tack → clear.
| Product | ID / SKU | Status · use |
|---|---|---|
| Eagle Super Assilex K-600 Sky | half sheets | Owned; locked choice |
| Eagle Assilex hand pad | matching pad | Owned |
| 3M Scotch-Brite Ultra Fine Gray | 7448 | Selected; rivets, seams, difficult geometry |
| Conventional P400 wet/dry | — | Owned |
Post-clear defect correction. Sequence: inspect clear → K3000 where possible → K2000 locally only if needed → K3000 → compound → polish. (Deliberately not K2000 the whole plane.)
| Product | ID / SKU | Status · use |
|---|---|---|
| Eagle Super Buflex K-2000 Green | 195-1505 (5", no holes, 25) | Ordered |
| Eagle Super Buflex K-3000 Black | 195-1504 (5", no holes, 25) | Ordered |
| Eagle Super Buflex Interface Pad | 971-0066 (5", ×2) | Ordered |
| DeWalt Random Orbit Sander | D26453 (5", 3/32" orbit) | Owned |
Buffing & polishing
Workflow: Buflex → G9 + 34122/34130 compound → 34123/34133 polish.
| Product | ID / SKU | Status · use |
|---|---|---|
| Griot's Garage G9 Random Orbital | 10901 | Selected |
| Griot's 5" Vented Orbital Backing Plate | 10555 | Selected |
| 3M Perfect-It RO Compound | 34130 (16 oz) | Selected |
| 3M Perfect-It RO Polish | 34133 (16 oz) | Selected |
| 3M Perfect-It RO White Foam Compounding Pad | 34122 (5", ×4) | Selected |
| 3M Perfect-It RO Purple Foam Polishing Pad | 34123 (5", ×4) | Selected |
| 3M Perfect-It RO wool pads | 34120 / 34121 | Deferred |
Fine-line masking
Settled on the FBS ProBand four-roll kit as the primary system (over 3M Fine Line 218 / 471+, which were investigated and passed on).
| Product | SKU | Intended use |
|---|---|---|
| FBS ProBand Red 1/16" | 48475 | Tight radii, lettering, inside corners |
| FBS ProBand Red 1/8" | 48480 | Tight curves; preferred for Evoke-style graphics |
| FBS ProBand Blue 1/8" | 48680 | General aircraft graphics |
| FBS ProBand Blue 1/4" | 48685 | Long, smooth curves and broader graphics |
Booth & environment
Target range: 68–90°F hard limits, preferably 72–80°F; relative humidity ≤50%, ideally under 45%. Important distinction: the fresh-air respirator protects me; it does not make a consumer blower explosion-proof, so I don't treat the stock ventilation blower as fire/vapor management.
| Item | Notes |
|---|---|
| VEVOR inflatable paint booth (~33 × 20 × 13 ft class) | Fuselage-capable driveway booth |
| ~1100 W inflation blower / ~950 W ventilation blower | Stock, with the booth |
| Fresh-air supplied respirator | Borrowed; personal protection only |
Cleaning (PPS / Apollo)
PPS means I avoid washing reusable cups most sessions — cleanup is the gun's fluid passage, the S34 adapter, nozzle, air cap, and needle. Kit: solvent-resistant squeeze/wash bottle with an angled nozzle, soft solvent-compatible gun brushes (Apollo FS1900 brush kit or equivalent), lint-free wipes, and a covered metal waste-solvent container.
Fixtures & supports
Padded horizontal wing stands / sawhorse supports (preferred over a vertical jig), a possible padded wing-flip cradle, a rigid wooden rotating "picture-frame" fixture for control surfaces, sacrificial clevis pins/bolts through the hinge bearings, short safety-wire drops, and universal stands with interchangeable heads. I abandoned the improvised vertical wing rotisserie — there's no outboard structural attach point I trust.
Investigated and passed on
Keeping the dead ends honest. Canopy/interior color is still converging on a muted sky-blue / blue-grey between Ford Area 51 and Subaru Cool Gray Khaki:
| Color | Code | Verdict |
|---|---|---|
| Ford Area 51 | KU / M7324 | Tested; rejected as too dark/gray |
| Subaru Cool Gray Khaki | PAF | Strong candidate / reference |
| Ford Performance Blue | FM | Investigated |
| Ford Velocity Blue | E7 / M7423 | Investigated |
| Ford Grabber Blue Metallic | AE / M7454 | Investigated |
| Ford Vapor Blue Metallic | K1 / M7490 | Investigated |
| Toyota Cavalry Blue | — | Blue-side boundary reference |
| Volvo Fjord Blue | — | Midpoint direction reference |
Also considered and passed on: 3M Scotch Fine Line 218 1/8" (06300) and 1/4" (06301), 3M 471+ vinyl fine-line (lost to FBS ProBand), and Eastwood Intercoat Clear (now optional).
Generics I already have (not re-listed above): disposable mixing cups, strainers, lint-free cloths, conventional masking tape, masking paper/plastic, ordinary wet/dry including P400, and a digital scale. The scale is great for tracking consumption, but paint ratios specified by volume stay volume ratios unless Eastwood gives a weight formula.
What I would do differently
Honestly, not much so far. Because I did the research and shot the panels, I knew what I was getting into and have not hit a real "I wish I had known that" moment. The one production change is the urethane primer: it is thick, so I will reduce it or move to a bigger needle and nozzle to knock down the orange peel before I shoot the real parts.
FAQ
Can you spray aircraft paint with a turbine spray gun?
It depends on the paint. Stewart Systems waterborne does not support a turbine gun because the heat it produces can make the paint behave badly, and they will not offer tech help if you try. I went with Eastwood OEM base and clear instead, which works well with my Eastwood turbine gun and comes in any color you can give a paint code for.
Do you need a spray booth to paint an experimental aircraft at home?
I did not want to fill the house with paint fumes, so I set up a 33x20x13 ft Vevor inflatable booth with paint-booth-grade filters, plus a Hobby Air fresh-air system, gloves, and a Tyvek suit. An inflatable booth is an accessible way to get a controlled space at home.
How many test panels should you spray before painting the plane?
Enough to shake out everything new to you. For me that meant a 2-stage base/clear system I had not used, my colors under clear, masking, a new 3M PPS cup system, my gun settings, epoxy and urethane primer coverage, needle sizes, and flash times. Start on craft paper with cheap acrylic to learn the gun, then move to real primer and paint on panels.
Paint or vinyl graphics on a homebuilt?
I chose paint. Vinyl wears and needs replacing every five years or so, it is harder to install, and it is harder to span control surfaces, which limits your design. If you mess up paint you sand it back and redo it; if you mess up vinyl you order a replacement and wait.